Manual

Manual
  • Svenska
  • Menu Menu

Programfolder in the template tool

2026-09-28/in Employee, English, Graphic design tool, Template tool

This page explains what is important to consider when creating a programme folder in the template tool, as well as how to use the template step by step. The template is called “Programfolder” in the template tool. The template is designed to create a physical printed programme folder that presents and promotes the programme to prospective students. You do not need any special permissions to use the template. 

About the Folder 

Format: The printed folder becomes an A4 sheet folded twice. Content is printed on both front and back. In the step-by-step guide below, each page’s function and suggested content are described. 

Number of pages: The folder has a total of 6 pages with different types of content. 

About the content: The content should resemble the structure and tone of the programme page on the education website. It should be simple, credible, and motivating for the target group: prospective students. The content should inspire them to read more about the programme online. Read more about content guidelines here: https://umeauniversity.sharepoint.com/sites/webbredaktor/SitePages/Inneh%C3%A5llsguide-f%C3%B6r-utbildningswebben.aspx  

Find the template: Log in here (link: https://umu.bmc.nu/System/) and open the document template “Programfolder” in the template tool. Choose english as your language under “My user account”. 

Front 

This page becomes the folder’s front cover. It displays the programme name, structure, and a suitable image. 

Step by Step 

  1. Select language, organisation, and background color in the top module. Depending on the organisation you choose, the logo will change. 
  2. Enter the name of the programme in the heading field. 
    • Keep the heading short.
    • In the subheading, you can add a specialization or a natural continuation of the name. 
    • Example: 
      • Heading: Bachelor’s Programme in Sports Science 
      • Subheading: with a specialization in strategic leadership and development
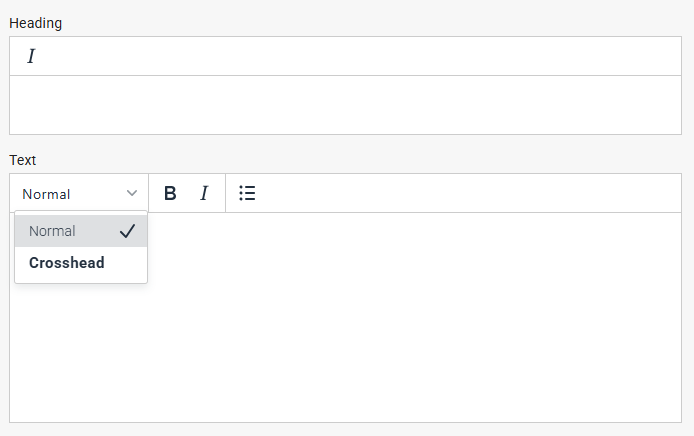
        Skärmbild på hur rubrik och text läggs in.
         
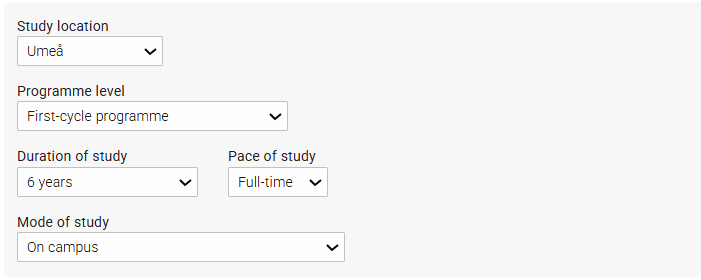
  3. Select study location, duration of study, and pace of study. (Note that the number of credits is affected by both duration of studies and pace of studies.) 
  4. Select programme level and mode of studies.
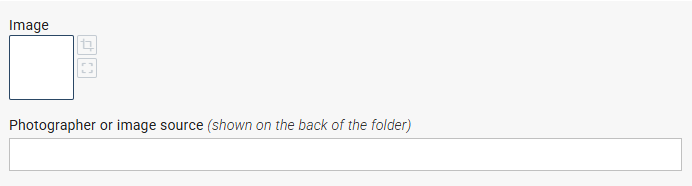
  5. Insert an image (fills the page below the top module). Read more about inserting images: https://manual.umu.se/en/insert-an-image-in-the-graphic-design-tool/  
    • Considerations for image selection: Our Visual Language 
    • Click the image field to choose an image from the Media Bank. 
    • Crop if needed (the image has fixed dimensions, but you can adjust which part is visible). 
    • Specify photographer or image source (appears on the back page).
Fold-in flap  

This page is visible when the folder is first opened. It consists of an image at the top and 1–3 modules with strengths and/or quotes. When fully unfolded, this page is placed on the far right of the back side. The purpose is to quickly give a positive impression of the programme and highlight its main qualities. 

What is a “strength”? 

It can be opportunities for internships, work during studies, hands-on learning, study abroad options, elective courses — anything that creates value for the target group. Highlighting 1–3 selected strengths helps prospective students quickly understand the program’s profile and advantages. These should not be perceived as a complete description, but rather as a selection of the program’s most attractive or unique qualities. Read more about strengths here: Styrkor med programmet 

The quote serves as a validation that the strengths presented are true in practice. 

Step by Step 

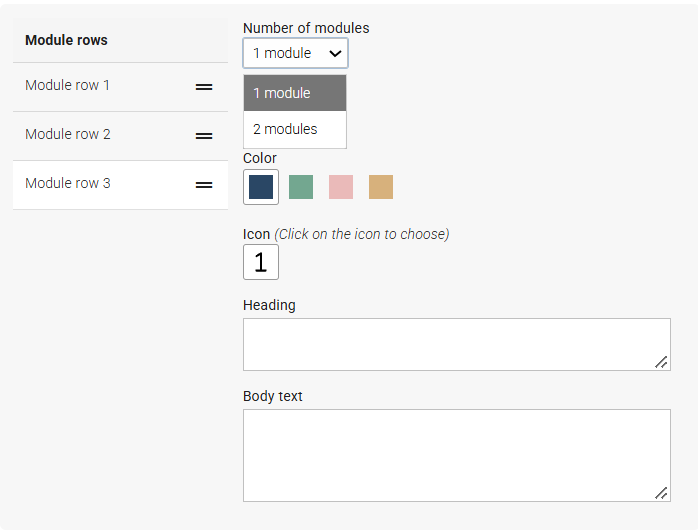
  1. Select number of module rows (max three). Each row can have one wide module or two smaller ones. 
  2. Select a module row and edit it. 
  3. Choose number of modules per row (1 or 2).
     
  4. If two modules: edit the first in the top field and the second further down.
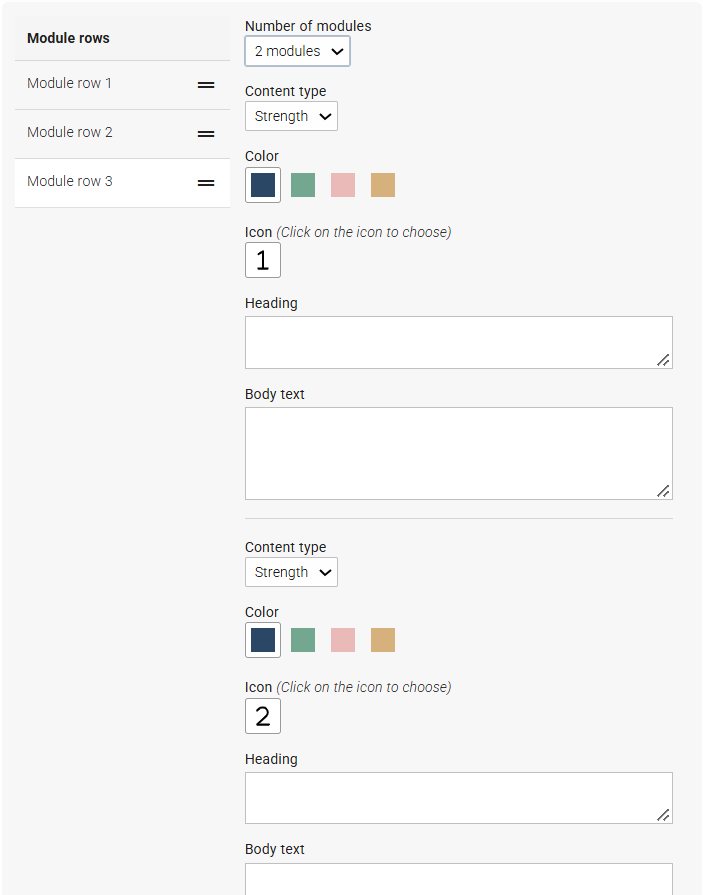
  5. Choose content type: strength or quote.
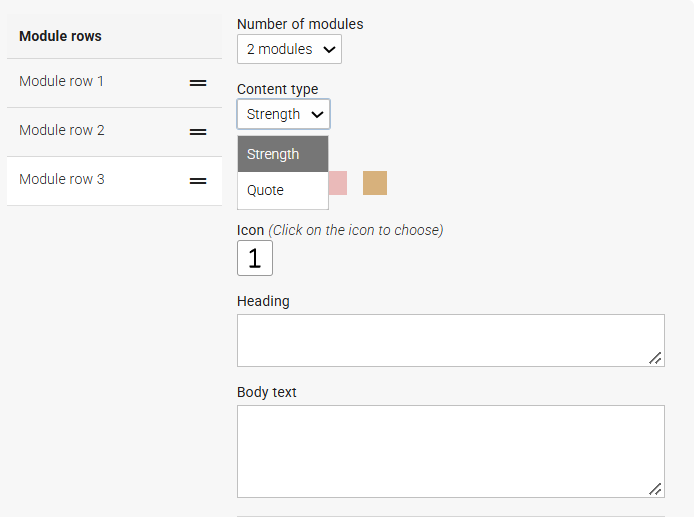
  • Strength

    1. Choose color (module background color) 
    2. Choose icon 
    3. Write a short and concise heading 
    4. Add a short and concise body text (optional) 
  • Quote 
    1. Choose color (module background color) 
    2. Write the quote (text becomes italic with quotation marks automatically) 
    3. Specify quote source (name, role, or both) 
  1. Image 
    1. Click the image field to choose an image from the Media Bank 
    2. Crop if needed 
    3. Specify photographer or image source 
    4. Write heading and body text (text appears on the image) 
    5. Gradient behind text can be turned off. Consider readability. 

 Edit all your modules according to the instructions above. Updates appear in real time in the preview. 

Inside Left & Center 

These two pages together present the program’s content, structure, and opportunities. Keep the layout airy with paragraphs, subheadings, and elements that break up the text. The spread has two columns in total, one column per page. 

Consider answering: 

  • How does one study in the programme? 
  • What careers can graduates pursue? How does the programme connect to real-world roles? 
  • What makes the programme special or particularly interesting? Exchange opportunities? Extensive practical components? 

Step by Step 

  1. Write the main heading (appears across both pages). You may draw inspiration from the programme page online. 
  2. Write a short preamble. The text is slightly larger than body text. You can use italics if you like.
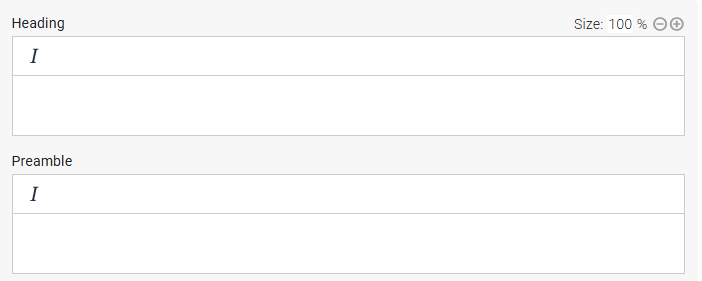
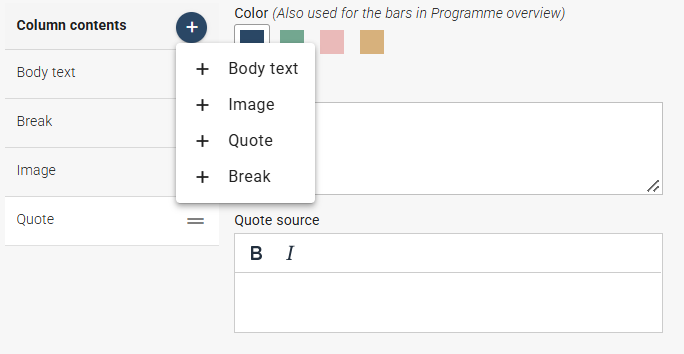
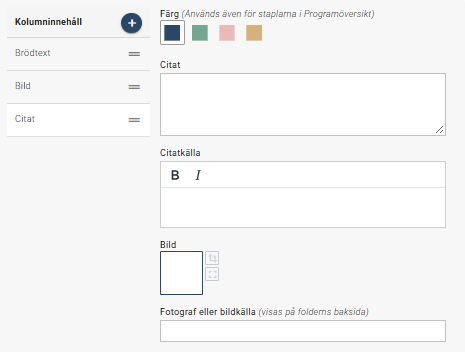
  3. Insert all your content. A column with body text is included by default. If you add more text than fits in one column, it flows into the next. Under the plus sign in the blue box, you can add different column content types. They appear in a list where you can reorder them by dragging the two lines on the right. 

Column content types available: 

  • Body text 
  • Image 
  • Quote 
  • Break 

Body Text 

To place an image or quote at the correct position, you may need to divide text into different column content blocks. In this block för body text, you can write a crosshead, body text (normal), and bullet lists. 

  1. Write crosshead 
  2. Write body text (normal) 
  3. Add bullet list if needed 

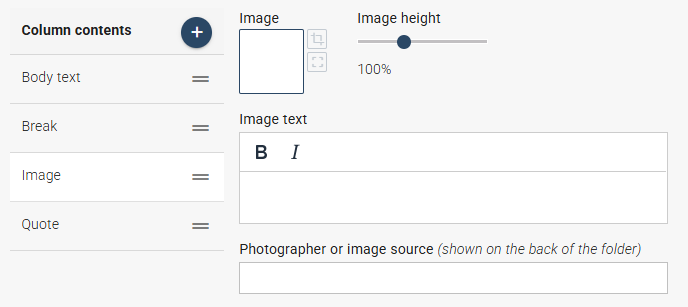
Image 

  1. Click the image field to choose an image from the Media Bank 
  2. Crop and adjust height if needed (image width is standardized) 
  3. Write image text (appears as smaller text below the image) 
  4. Specify photographer or image source

Quote 

This block allows you to insert a quote that visually breaks up the page. Choose a quote from a current student or alumnus that reinforces the content. 

  1. Choose text color 
  2. Write the quote (italic + quotation marks automatically) 
  3. Specify quote source (e.g., Name Surname, student/alumnus)
  4. Would you like to include a photo of the person quoted? Click the image field to select an image from the Media Bank. Then enter the photographer’s name or image source. The image will be displayed in a smaller, circular crop alongside the quote.
Column Break 

You can manually force text to continue in the next column using the column break module. 

Inside Right 

Here you choose between two page types: 

  • Programme overview (horizontal percentage bars) 
  • Image panel (full-page image with headline and short text) 
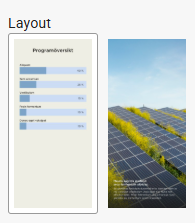
If you have a programme overview on the website, you can use it here. Note that if the overview has few bars, the page may look empty. 

Programme Overview 

Provides a quick overview of the program’s content. 

  1. Choose bar color 
  2. Add number of bars (max 10) 
  3. Specify bar heading and percentage for each bar. 
    A red text indicates if the total exceeds or falls below 100%.
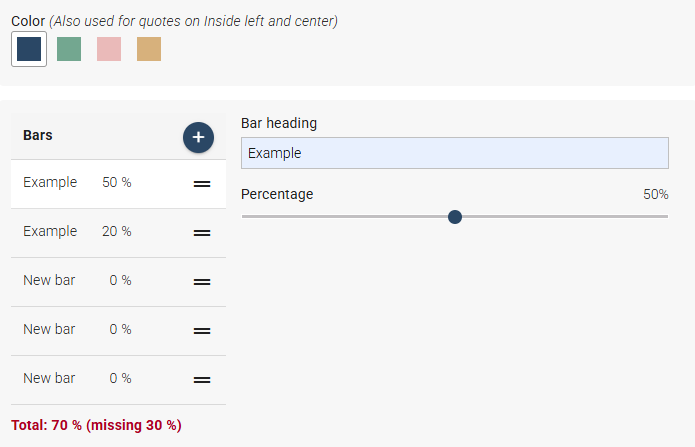
  4. Below the programme overview, you have the option to add body text, an image, and a quote. This can be useful if the programme content needs further clarification regarding elective courses, specialisations, or similar topics. If the programme overview is relatively brief, you can also use this content to make the page more visually appealing. Please note that the content below the programme overview should relate specifically to the programme content, as the overall heading of this page is Programme Overview.
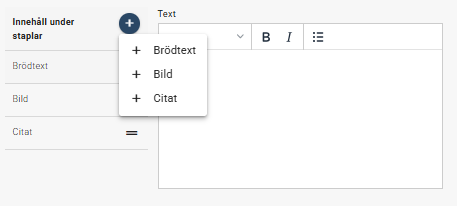
Image panel 

This page type uses an image, headline, and short text to convey a strong sense of the program. 

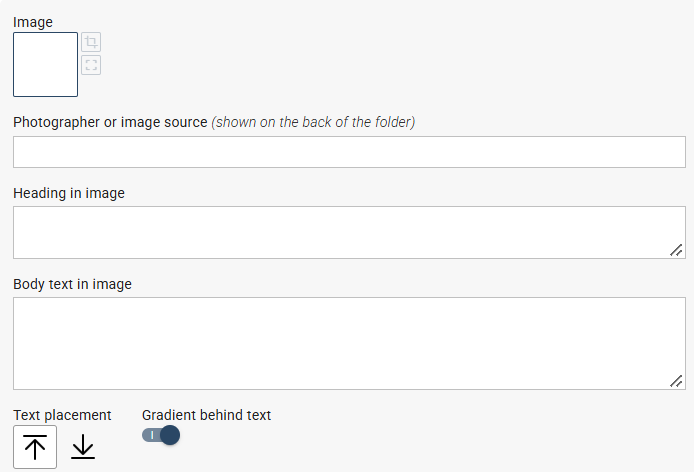
  1. Click the image field to choose an image from the Media Bank (preferably portrait format) 
  2. Specify photographer or image source 
  3. Write heading (appears on the image) 
  4. Write short body text (3–4 lines, appears on the image) 
  5. Adjust text placement with arrows if needed 
  6. Gradient behind text can be turned off. Consider readability.
Back  

This is the folder’s back cover when folded. Highlight briefly why one should choose the programme. 

Step by Step 

  1. Write heading (e.g., Why should I choose Programme X?) 
  2. Add a bullet list with the program’s main advantages 
  3. Add short text if needed 
  4. Finish with contact information 
    • Subheading: Contact 
    • Body text: role, programme, email and/or phone number  

A QR code linking to umu.se/utbildning is placed on the back. It cannot be changed or removed. 

https://manual.umu.se/wp-content/uploads/2018/02/manual-loggo.png 0 0 Ida Åberg https://manual.umu.se/wp-content/uploads/2018/02/manual-loggo.png Ida Åberg2026-09-28 09:39:152026-11-09 14:25:59Programfolder in the template tool

Assemble your thesis in the Graphic Design Tool

2025-03-20/in Graphic design tool

Use the layout template “Avhandling/Doctoral thesis” in the Graphic design tool to create the nailing leaflet and cover, as well as to compile the kappa (introductory summary) and the constituent papers into a cohesive unit.

You write the kappa in Word or another word processing program such as LaTeX. A Word template for the kappa and an accompanying guide are available for download on the Templates page on Aktum.

Using the assembly template helps you to:

  • Design the cover
  • Fill in the nailing leaflet
  • Generate the title page and dedication page
  • Upload the introductory chapter “kappa”
  • Upload and customize individual papers and design thumb grips
  • Follow Umeå University’s visual identiy
  • Place any required information in the correct place in the thesis

Read more

https://manual.umu.se/wp-content/uploads/2018/02/manual-loggo.png 0 0 Mikael Kohkoinen https://manual.umu.se/wp-content/uploads/2018/02/manual-loggo.png Mikael Kohkoinen2025-03-20 10:44:512026-06-03 16:20:01Assemble your thesis in the Graphic Design Tool

Create a scientific poster in the template tool

2023-08-28/in Employee, English, Graphic design tool, Template tool

This manual presents what settings the scientific poster template offers in the template tool.

  1. Open the document template “Vetenskaplig poster / Scientific poster” in the tool. Go to the log-in page.
  2. First, choose the size of the poster. You can choose among the predefined formats or customise the size.
    Document format
  3. Select a logo by choosing English or Swedish, depending on which language you are writing in.
    logotype language
  4. Your next choice is “Orientation”. Choose between portrait or landscape format.
    Orientation
  5. The template allows you to download and use your own content at the same time as it allows you to follow Umeå University’s visual identity by placing the logo in the right place. You can choose to use the template’s standard header. Click the white box to upload a print-optimised PDF with high-resolution images. Please bear in mind that creating a PDF of that quality requires a certain level of proficiency.
  6. In the next step, you can enter text for the page header (which is the blue box at the top of the page seen in the preview to the right of the screen). This box holds the headline, subtitle, authors and any potential footnote.
    the page header

    1. Start by choosing alignment as left or centre. (You can always go back and change this setting later depending on what looks best.)
    2. Enter the headline, which is automatically bold, but you may choose to italicise your headline. You can change the size of the headline using the plus and minus buttons above the text field.
    3. The subtitle can either be made bold and/or be italicised.
    4. Text in the Authors field can be made bold and/or italicised. You can also add a footnote to the authors.
    5. Footnotes are intended for organisational affiliation such as a department. Organisational names are often long, so use one footnote for each department and add that number to all names affiliated to the corresponding organisation.
      Example: Name Surname1,2, Name Surname2
      Footnote: 1. Department of Social Sciences, Umeå University, 2. Department of Natural Sciences, Luleå University of Technology
  7. The next field should contain your preamble, which is an introductory text. Try to keep the text short. This text will be slightly bigger in font than the main text. This text can also be made bold and/or be italicised.
  8. Your next choice is if you want to use a large image for your poster. There are three positionings to choose from under “Placement”. Remember to give credit to the photographer or illustrator under Caption & source. Learn how to insert an image.
  9. After this step, you can add your main content to the page. A text field is standard and is ready to be filled with text. If you overfill the text field, text will flow onto the next column.

    The blue plus sign contains further modules you can add and fill with content. Any module you add is listed underneath. By dragging the module by the two lines, you can rearrange the order of the modules. These modules are available:

    1. Text: To insert a fact box or add an image in the right place of the text, it may be necessary to distribute your text into several text modules. You can choose between two fonts for your main text. The text modules allow you to choose between two headline sizes, and italics is available for both.
      Standard format for main text is “Normal” but you can choose italics and/or bold. You can also add ordered and unordered lists to the text.
    2. Image: Here, you can insert an image to the width of one column. Remember to specify the source or name of photographer/illustrator in the Caption & source field. Learn how to insert an image.
    3. Infobox: In the infobox module, you can highlight particularly important text by placing it in a box with a coloured background. You can choose between four colours from the visual identity. There are two fonts to choose between if you wish to make it stand out more from the main text. You have the same opportunities to format text as in the text module.
    4. Break: You can actively choose to break a column allowing the text to flood into the next column using the break module.
  1. In the next step, you can specify your department and address. This can either be placed in the footer or in the right-hand column, depending on where there is most space.
  2. There is also a function to upload and position collaborator logos (up to four). If you have the need for more logos, you can create a joint image including all logos and upload them as one logo. If they will still not fit, you can consider placing them in one column as one image.
  3. This is the entire form. Be sure to save your work regularly. If you plan to send your poster to a printing office, you need to close the document. In the next view, you can place the document in the media basket. The media basket gives you a few options to choose from:
    • Paper: This has the fastest delivery time, but is fragile.
    • Laminated paper: By laminating the paper, it is given a protective layer.
    • Textile: If you plan to travel with your poster, textile is a good choice. You can easily fold the poster and pack it in a suitcase. Once you arrive, you can carefully iron it or hang it in a bathroom to let the moisture smooth the creases. Please note that all delivery times specified apply to collection at Infocenter on Campus Umeå. You will receive a message when the poster is ready for pick-up. If you wish the poster to be delivered elsewhere, you need to account for an additional 1–2 working days for delivery.
https://manual.umu.se/wp-content/uploads/2018/02/manual-loggo.png 0 0 Ida Åberg https://manual.umu.se/wp-content/uploads/2018/02/manual-loggo.png Ida Åberg2023-08-28 10:21:292026-11-09 14:04:59Create a scientific poster in the template tool

Doctoral thesis cover in the template tool

2023-08-28/in Employee, English, Graphic design tool, Template tool

Here you can see a few examples of layouts you can choose between for your doctoral thesis covers.

Layout:

Background colour on front and back

Doctoral thesis cover in the graphic design tool

Image on front and back

Image on front and background colour on back

Image with white frame on front

Small image on front

Doctoral thesis cover in the graphic design tool

https://manual.umu.se/wp-content/uploads/2018/02/manual-loggo.png 0 0 Ida Åberg https://manual.umu.se/wp-content/uploads/2018/02/manual-loggo.png Ida Åberg2023-08-28 10:14:142026-11-09 14:05:38Doctoral thesis cover in the template tool

How to use a template in the template tool

2023-08-17/in Employee, English, Graphic design tool, Template tool

This page provides information on how to use templates in the template tool. This example uses the A4 sheet template, “A4-blad”.

General settings

  1. Choose the A4-blad template under document templates on the start page of the template tool.
  2. Once you have opened the template, you will find a form on the left-hand side next to the preview pane.
    1. Under “Layout”, you can choose to use a colour plate or an image.
      Layout
    2. “Document language” means that you choose what language setting the document should have. Based upon your choice, the logo will switch between English or Swedish. If you choose “Swedish”, you can select the Ume Sami logo.
  3. By clicking “Colour plate”, you can choose the colour of the headline background and fact box.
  4. As background colour, you can choose between the paper colour or the University’s light beige colour.
  5. If you wish to have a double-sided A4, select “2 pages”.
    2 pages – Grafiskt mallverktyg

Select image

If you have chosen an image layout, the image settings will appear next. Find more details on selecting an image.

  1. Click the box under “Image” to select an image. You can choose to search for an image in the University’s image database, Mediabanken, or download your own image. Always check that you have the right to use the image. Go to Mediabanken to find information about right to use. Search for the image’s ID number in Mediabanken if you know what image you wish to use.
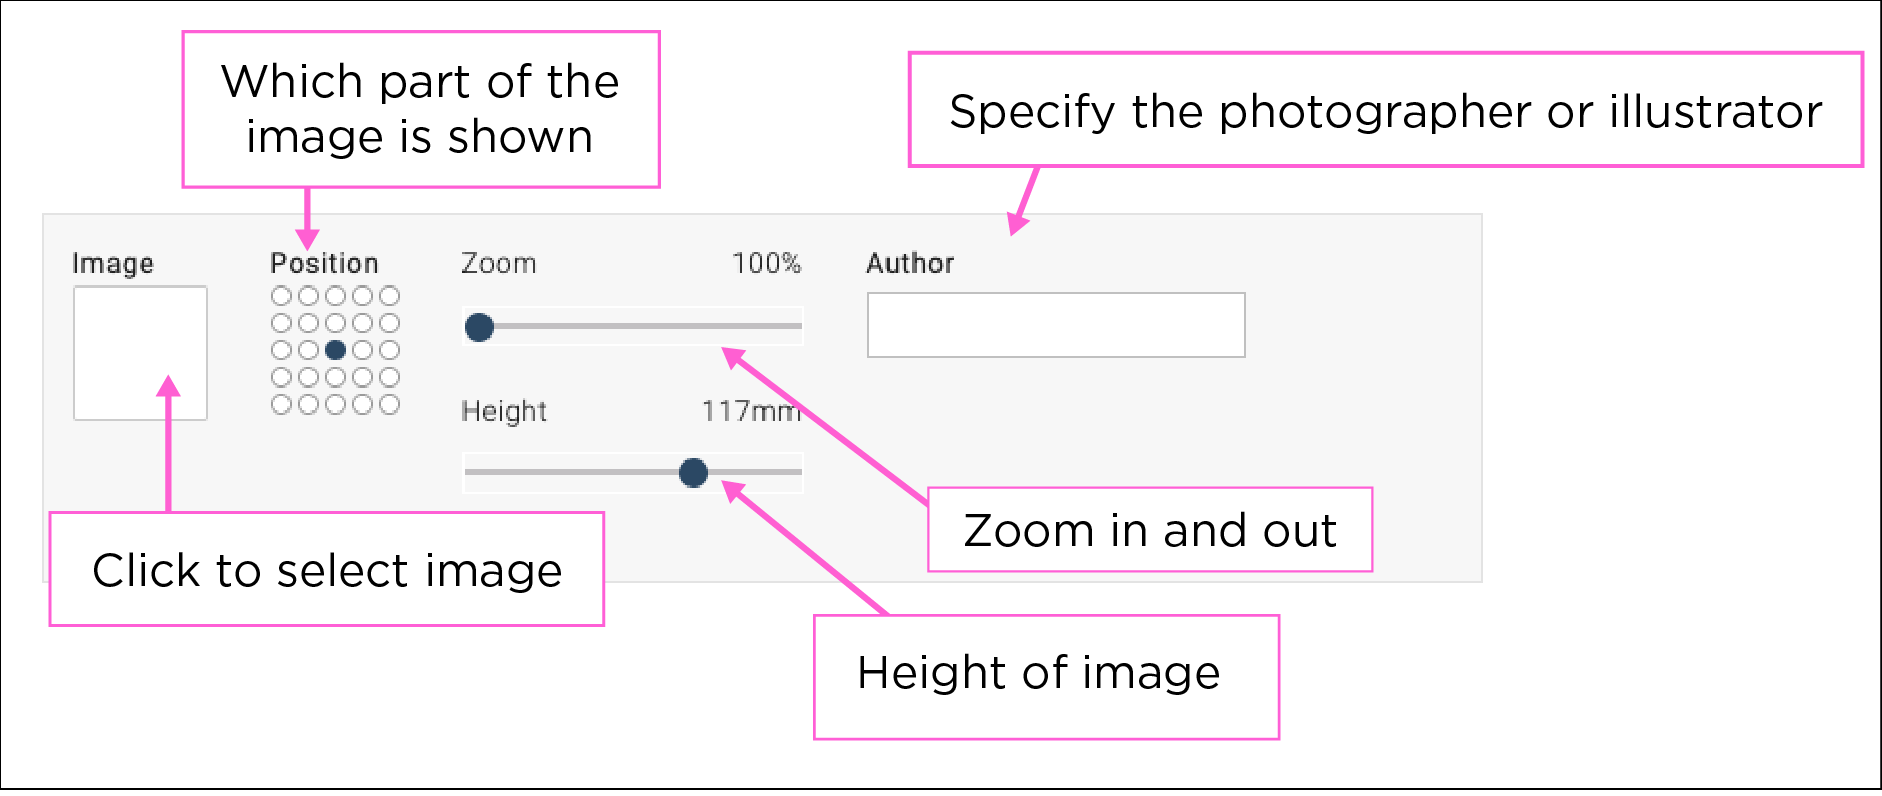
  2. To select which part of the image should be visible, use the grid under “Position”. You can also zoom in on the image and alter the height of the image.
  3. Always give credit to the photographer or illustrator under “Author”.

Add text

  1. Next up is adding text in the text boxes. The text boxes allow you to:
    1. emphasise text using bold or italics;
    2. create ordered and unordered lists;
    3. use subheadings.
  2. This template (A4-blad) also allows you to alter the size of the heading.
  3. If you add content under “Fact box”, a fact box will appear on the page. You can select the positioning of the fact box in relation to the main text through the grid. The border colour of the fact box is determined by the colour set under “Colour plate” at the top of the form.

Further settings

  1. The next part of the form is intended to be used to present lecturers, authors or similar. You can add an image in a circle accompanied by a headline and a short text.
  2. Click “QR code” if you wish to use a QR code to guide viewers to further reading, or to a registration page for an event, for instance. Paste a functioning web address in the field “Generate QR code, enter web address”. Write a descriptive text of where the link in the QR code leads to.

Download, print or order press

  1. Save the page by clicking “Save” and choose Umeå University. Name the document so you know which one it is. Specifying the template format in the name could be a good idea. Click “Close”.
  2. Once you have closed the document, you will access the document properties. From this page, you can choose to further edit the document or take other actions.
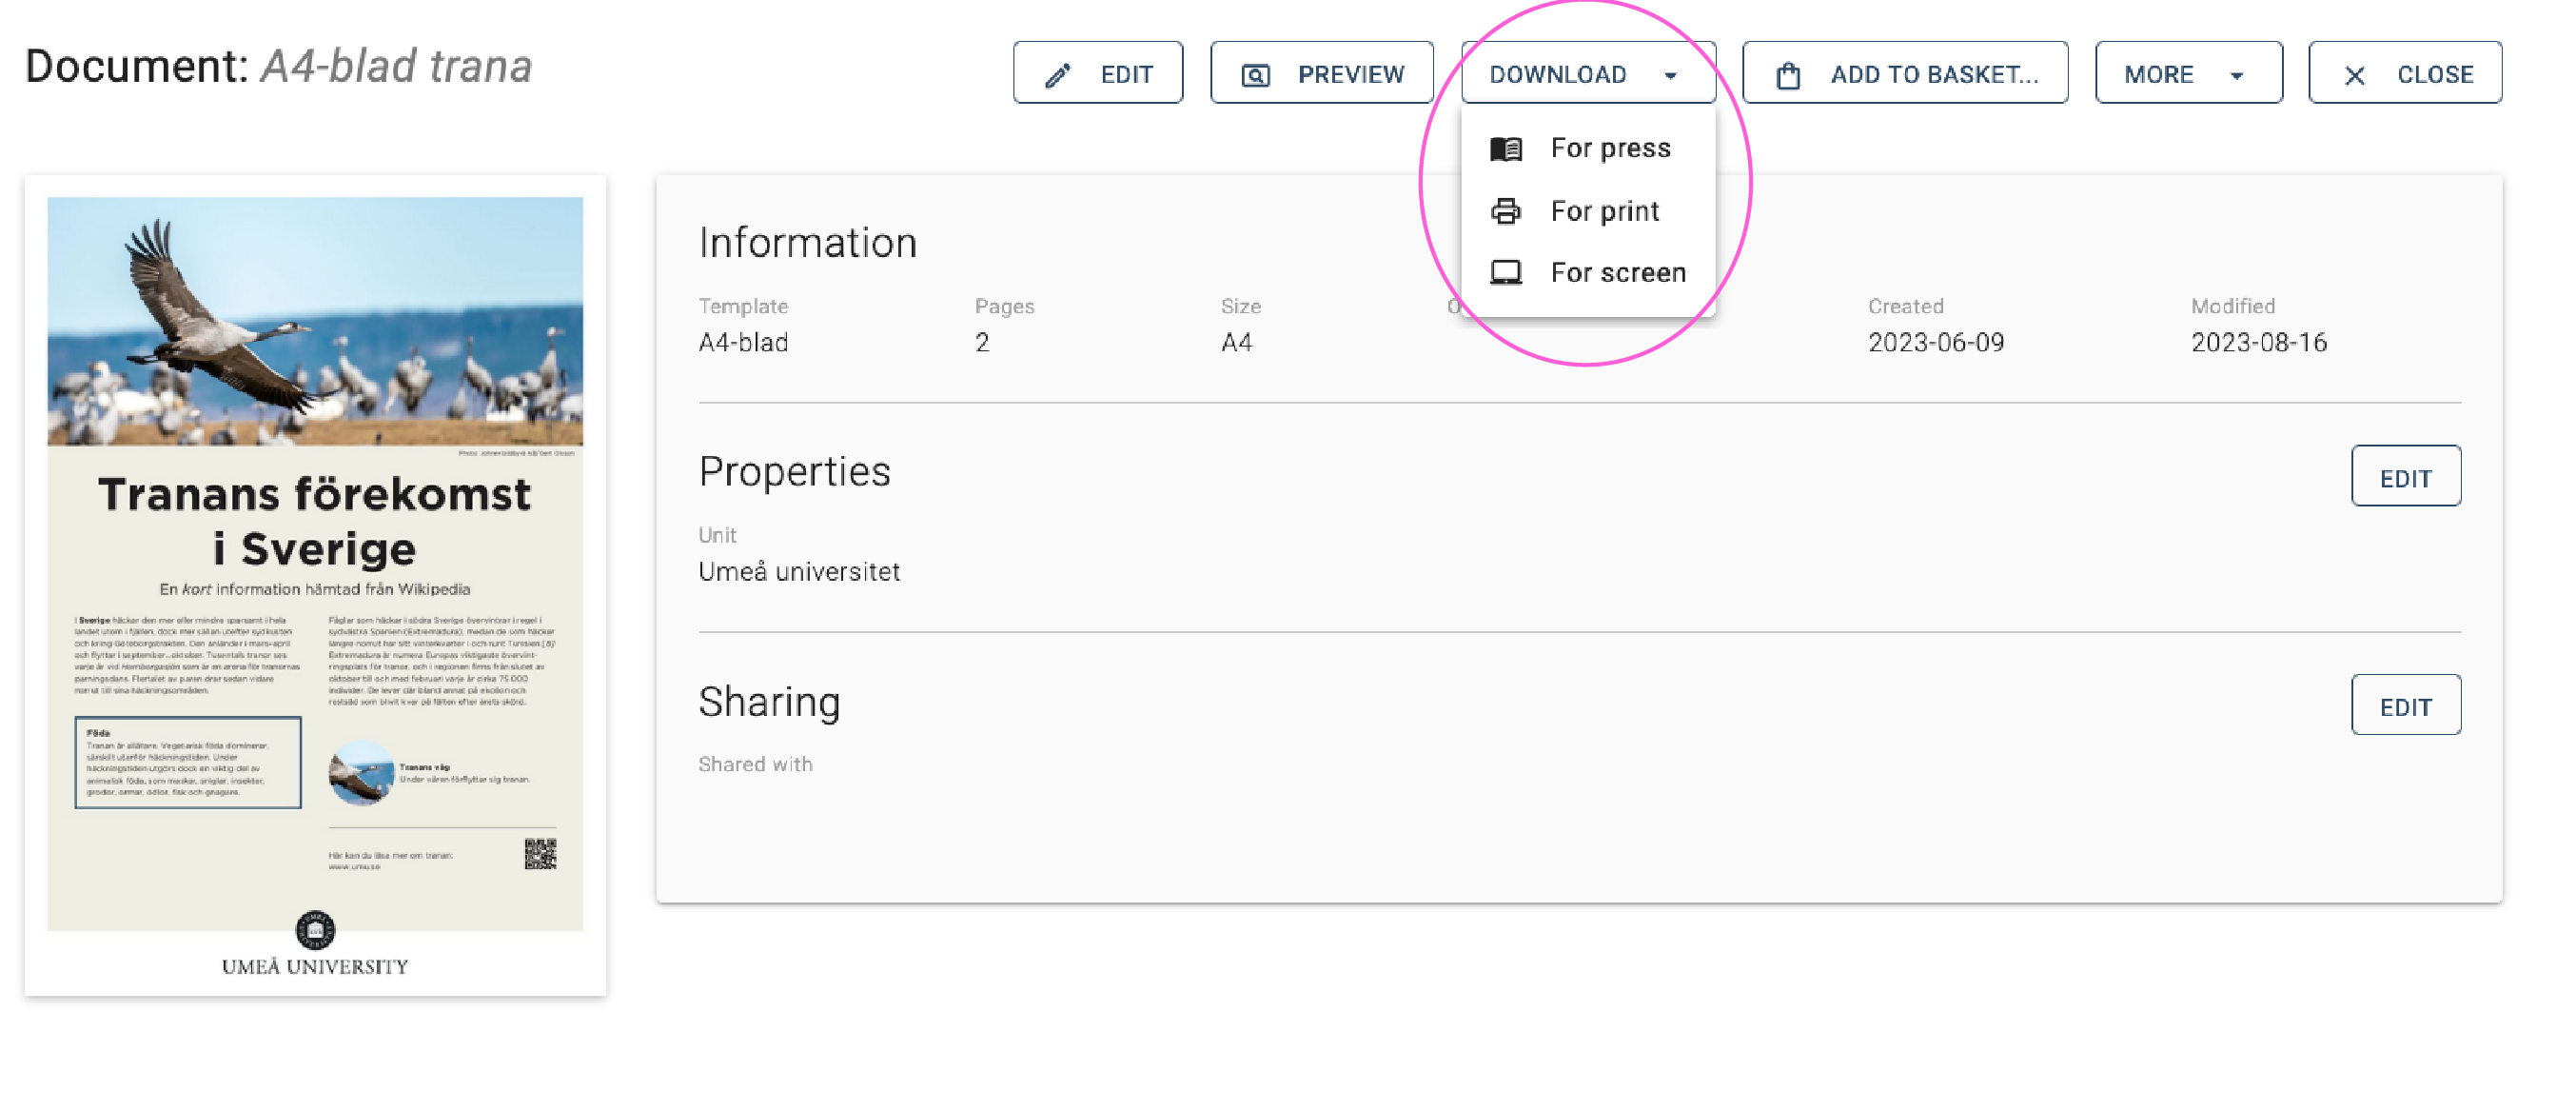
  3. Under “Download”, you can choose between three options. All options generate a PDF, but with varying properties. Learn more about downloading and printing a document.
  4. “For press” generates a PDF with crop marks that is larger than the final format. This is a good choice if you are sending your PDF to a printing office.
  5. “For print” generates a high-resolution PDF to be printed on your own printer. This provides that any images added to the document are in high-resolution formats.
  6. “For screen” generates a low-resolution PDF for digital use. If you plan to upload the file to a web page, you must first make the document accessible.
  7. Add the document to the media basket if you want to order professional printing.
  8. Under “More”, you can do the following:
    1. “Send proof” means that you will send a link to a PDF copy of the document.
    2. “Send document by email” means you send a PDF via email. You can choose which PDF version to send – for press, for print or for screen.
    3. “View document history” allows you to see when the document was saved, downloaded or sent.
    4. “Save copy” allows you to produce a similar document but with slight modification. You are asked to choose a new name.
    5. “Delete document” removes the document.

See a video of the content presented above

English subtitles can be enabled under CC in the bottom-right corner. Although the tool interface is Swedish in the film, the tool can be set to English under My user account.

https://manual.umu.se/wp-content/uploads/2018/02/manual-loggo.png 0 0 Ida Åberg https://manual.umu.se/wp-content/uploads/2018/02/manual-loggo.png Ida Åberg2023-08-17 13:39:362026-11-09 14:05:50How to use a template in the template tool

How to download and print using the template tool

2023-08-17/in Employee, English, Graphic design tool, Template tool

When you have finalised a document by filling one of the document templates with content, you must save and close the document. This will take you to the properties view from which you can: continue to edit, preview, download, order print, share documents, among other things.

To print a document, you can choose to preview and print straight from the tab that pops up in your web browser. Or you can choose to download a PDF. There are three different types of PDFs to download that all have different characteristics:

  1. “For press” generates a PDF with crop marks that is larger than the final format. This is a good choice if you are sending your PDF to a printing office.
  2. “For print” generates a high-resolution PDF to be printed on your own printer. This provides that any images added to the document are high-resolution images.
  3. “For screen” generates a low-resolution PDF for digital use.  If you plan to upload the file to a web page, you must first make the document accessible.

Download a PDF – Grafiskt mallverktyg

https://manual.umu.se/wp-content/uploads/2018/02/manual-loggo.png 0 0 Ida Åberg https://manual.umu.se/wp-content/uploads/2018/02/manual-loggo.png Ida Åberg2023-08-17 13:29:592026-11-09 14:06:01How to download and print using the template tool

Template tool – introduction

2023-08-17/in Employee, English, Graphic design tool, Template tool

The template tool has been developed to simplify for staff to produce products for print and press with the help of templates following Umeå University’s visual identity. This page provides an overview of the functionalities available in the tool.

You can choose to learn more by watching the video or by reading the text below.

Introductory video

English subtitles can be enabled under CC in the bottom-right corner. Although the tool interface is Swedish in the film, the tool can be set to English under My user account.


Logging in

To use the template tool, you need to log in using your Umu-id.

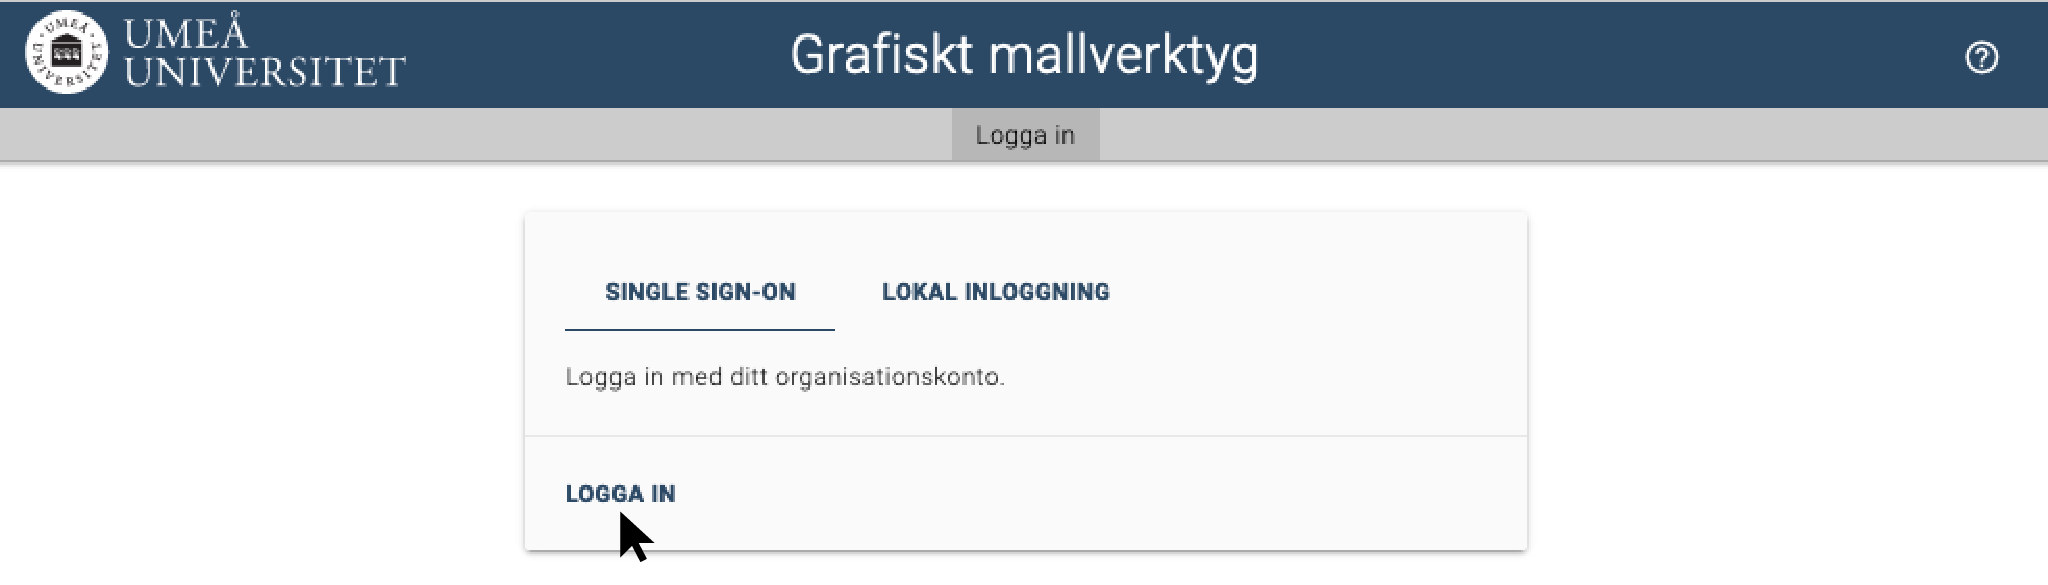
  1. Go to the login page for the template tool.
  2. Click Log in.
    Grafiskt mallverktyg -log in

Start page

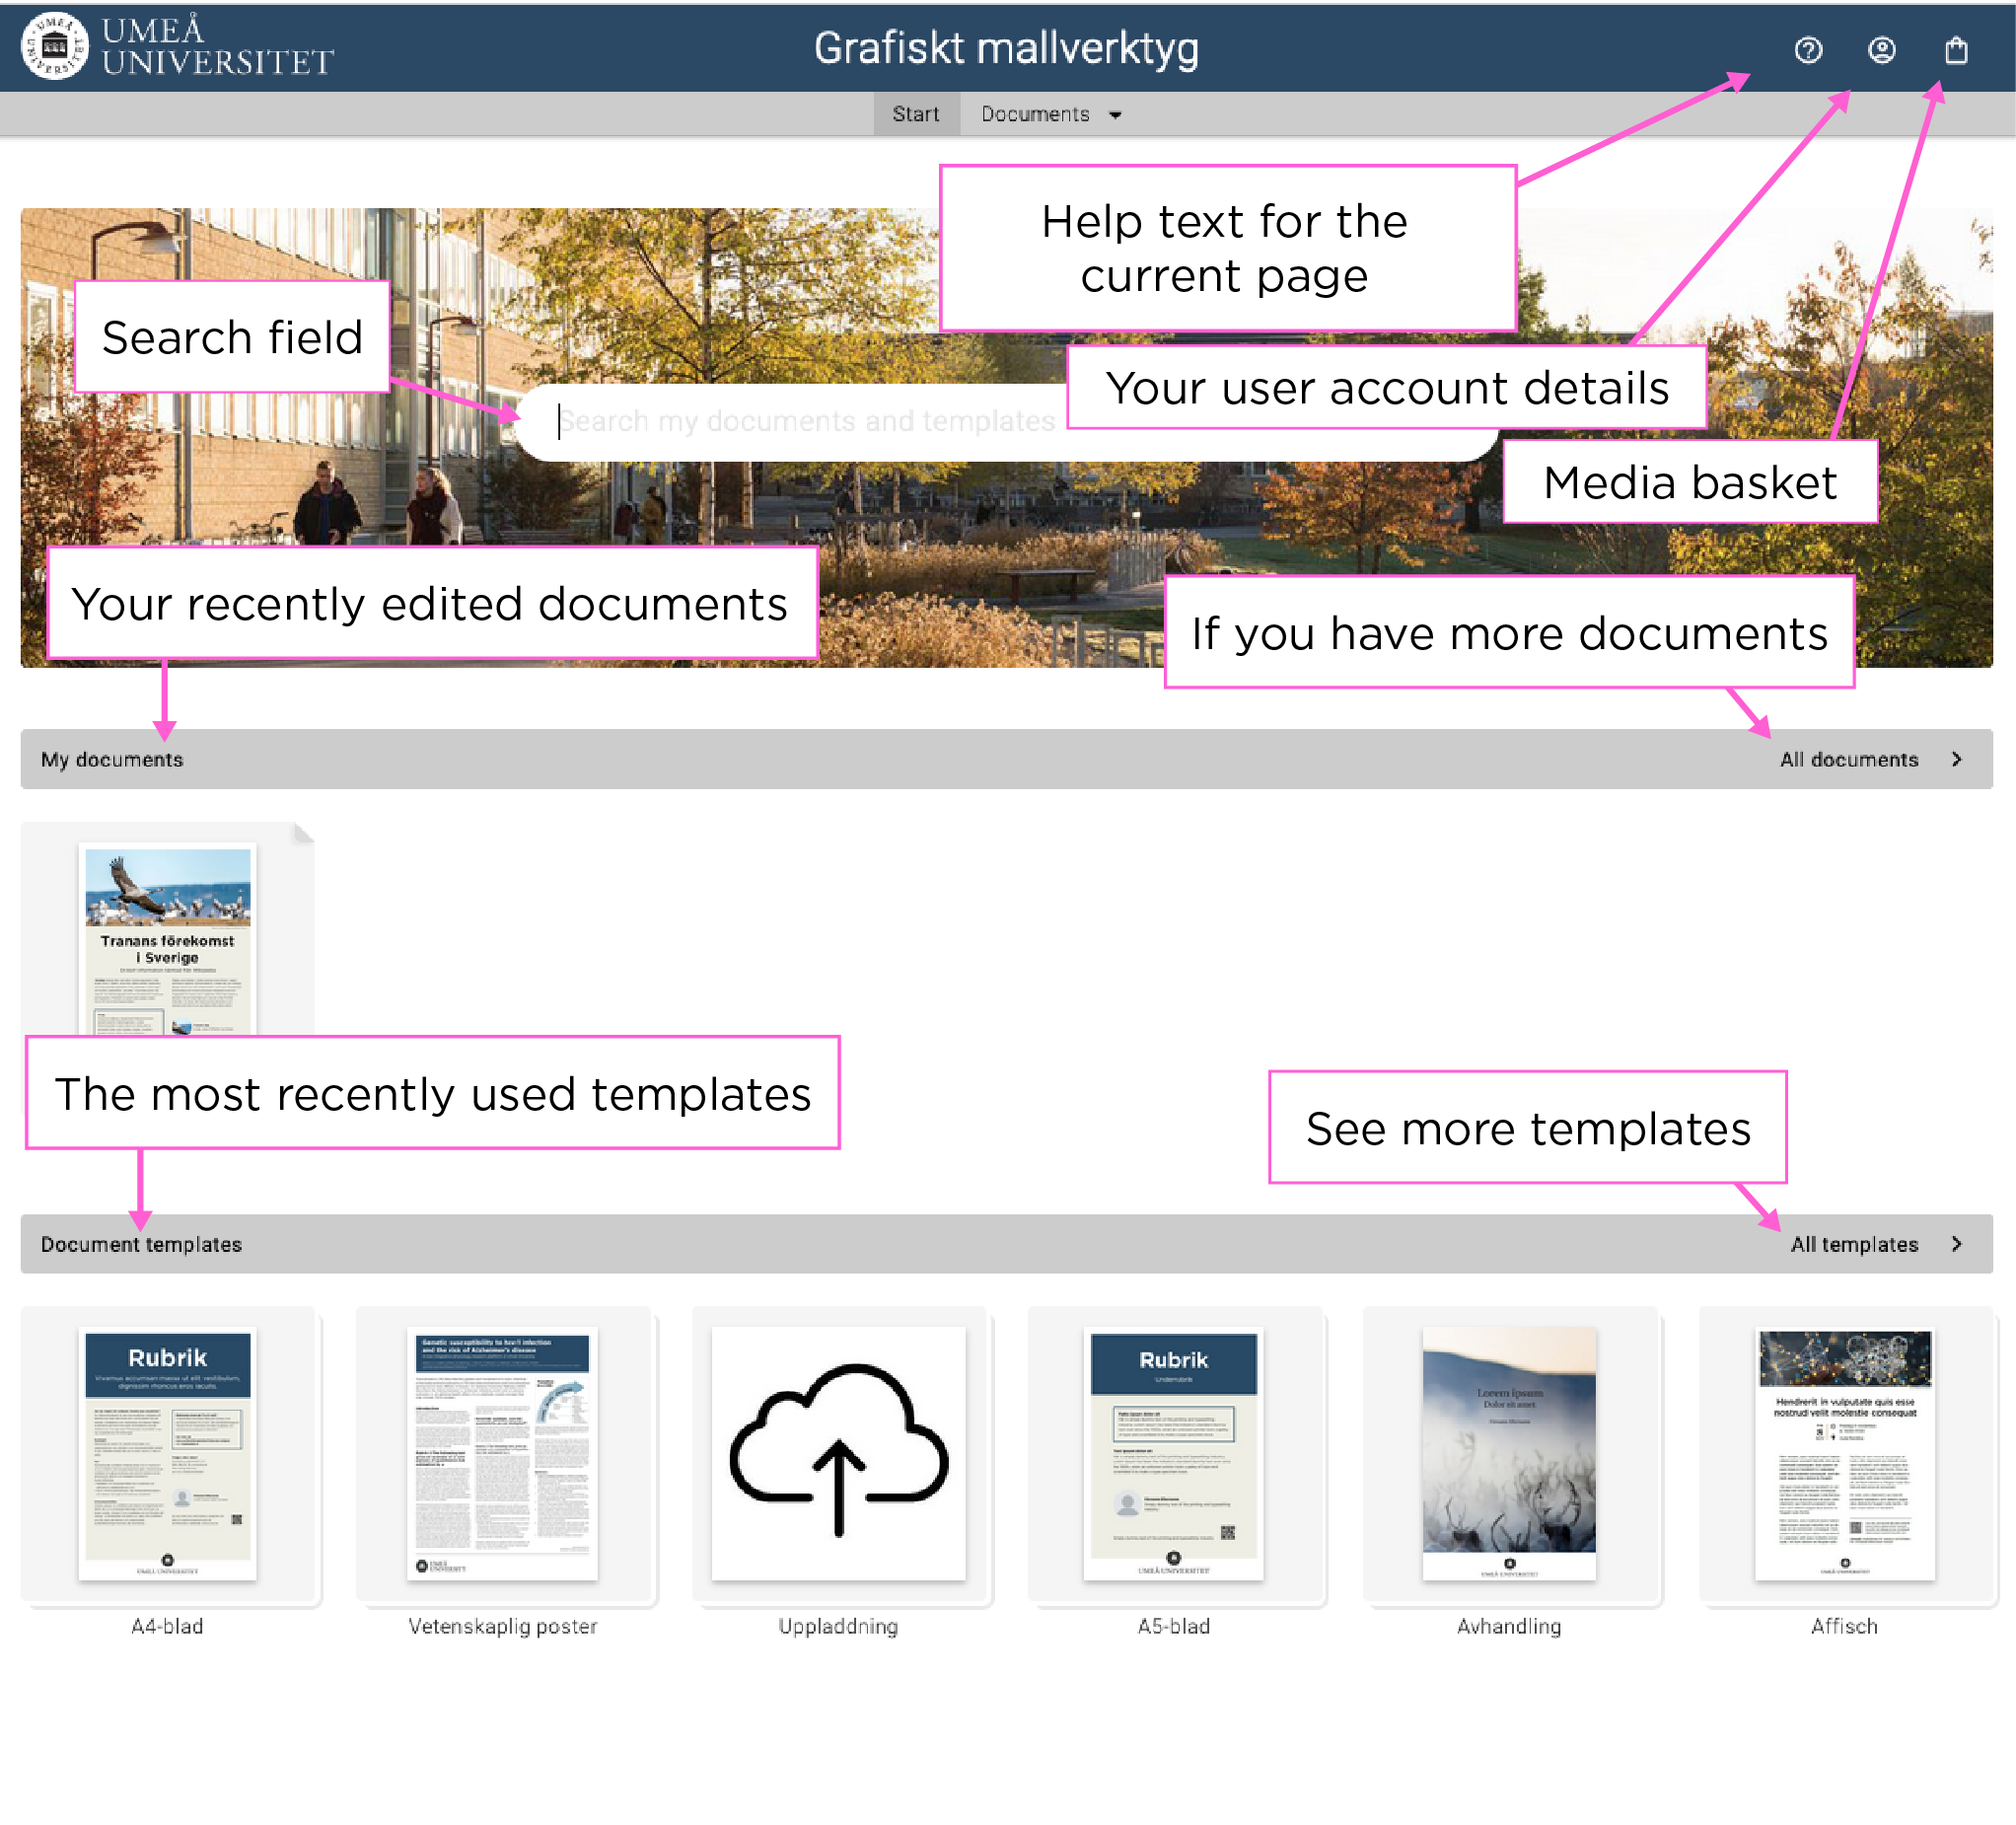
On the start page, you will find a search field where you can search among templates or documents. You can also see your recently edited documents and available document templates.

Start page – grafiskt mallverktyg

Under the icon “My user account” in the top-right corner, you can:

  • change your account details;
  • set up and manage user groups;
  • overview your orders;
  • set system language; and
  • log out.

The checkout icon is your media basket, which contains all documents you have added. Press the icon to proceed with placing an order.


https://manual.umu.se/wp-content/uploads/2018/02/manual-loggo.png 0 0 Ida Åberg https://manual.umu.se/wp-content/uploads/2018/02/manual-loggo.png Ida Åberg2023-08-17 13:28:012026-11-09 14:26:48Template tool – introduction

Insert an image in the template tool

2023-08-17/in Employee, English, Graphic design tool, Template tool

Settings may differ slightly between the different templates in the tool.

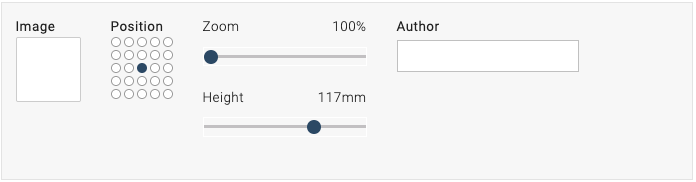
The form for the document template looks like this:

Document template for images.

  1. Click the empty white box to select image and the following field will pop up:
    Image field
  2. Under “Search”, you can search and select an image from the University’s image database, Mediabanken. The easiest way to search among available images is to go to Mediabanken, find the ID number and paste it in the template tool search field.  Always check that you have the right to use the image. You can also choose to upload your own image.
  3. After selecting an image, there are some settings you can make.
    Image settings

    • “Position” determines what part of the image is shown. Try your way forward.
    • “Zoom” allows you to zoom in and out of the image within the available area.
    • “Height” is available in some templates and allows you to alter the height of the image.
    • In the field labelled “Author”, you must specify the photographer or illustrator of the photo or illustration.
https://manual.umu.se/wp-content/uploads/2018/02/manual-loggo.png 0 0 Ida Åberg https://manual.umu.se/wp-content/uploads/2018/02/manual-loggo.png Ida Åberg2023-08-17 13:08:052026-11-09 14:06:28Insert an image in the template tool

Contact ITS Service Desk

Create a support ticket at www.umu.se/servicedesk, call 090-786 63 00 or visit us next to Infocenter.

Kategorier

Related links

  • Template tool – introduction
  • How to use a template in the template tool
  • How to download and print using the template tool
Scroll to top Scroll to top Scroll to top