Manual

Manual
  • Svenska
  • Menu Menu

Tele2 Open 4.0 User Guide for iPhone

2024-08-07/in Employee, English

Tele2Open is an add-on service for those who need coverage beyond the ordinary. In addition to access to Tele2’s network, you also have the option to use several Swedish operators’ networks.

When you activate the service, you can make calls on multiple operators’ radio networks in Sweden. The phone automatically searches for an operator.

The SIM card comes pre-configured with the correct settings and is ready to use. If you make no active choices in the settings, the phone will prioritize Tele2 as long as coverage is available. If Tele2 coverage is missing, the phone will look for the next available operator with coverage. You can lock to a specific operator in your phone’s settings.

Order the service

To activate the service, you must order Tele2Open, which is a special subscription and requires a new SIM card. This is ordered via teleservice@umu.se.

Make sure the APN settings are correct

Go to Settings > Mobile Network (select the active SIM if there are multiple) > Mobile Data Network.
Note: The device must be restarted for the MMS settings to work.

Configure as follows:

APN: internet.tele2.se
MMSC: http://mmsc.tele2.se
MMS-proxy: mmsproxy.tele2.se:8080
MMS-maxstorlek 2097152
MMS UA Prof URL

https://manual.umu.se/wp-content/uploads/2018/02/manual-loggo.png 0 0 Elin Sköld https://manual.umu.se/wp-content/uploads/2018/02/manual-loggo.png Elin Sköld2024-08-07 09:57:302026-06-01 11:03:18Tele2 Open 4.0 User Guide for iPhone

Size of email attachments

2024-08-06/in Email, Employee, Okategoriserade

Information on how big files you can send via email.

Read more
https://manual.umu.se/wp-content/uploads/2018/02/manual-loggo.png 0 0 Erik Öhman https://manual.umu.se/wp-content/uploads/2018/02/manual-loggo.png Erik Öhman2024-08-06 13:20:002025-11-03 08:13:15Size of email attachments

Turn on Microsoft editor in the Edge browser

2024-08-06/in Employee, English, Microsoft 365, Okategoriserade, Student

This instruction shows how to turn on the Microsoft editor in the Edge browser. To access the add-on, you must have an A5 license in Microsoft 365, all employees and students and affiliates who have purchased it have it.

  1. In the Edge browser, click the three dots at the top right, then Add-ons, then “Get extensions for Microsoft edge”.


  2. In the search box, search for Microsoft Editor.
  3. Click Download and then “Add Extensions”
  4. You can now go through the three dots and then Add-ons again, there Microsoft editor will appear.
  5. You can choose to add the extension to the toolbar through this icon
https://manual.umu.se/wp-content/uploads/2018/02/manual-loggo.png 0 0 Elin Sköld https://manual.umu.se/wp-content/uploads/2018/02/manual-loggo.png Elin Sköld2024-08-06 11:15:562025-12-10 09:06:40Turn on Microsoft editor in the Edge browser

About groups in Microsoft 365

2024-08-06/in Employee, English, Microsoft 365, Okategoriserade

When you add a member to a group in Microsoft 365, they get the correct permissions to everything that the group includes using the Microsoft 365 Groups service. Groups should preferably have two owners and it is important to delete groups that are no longer in use.

What is a Microsoft 365 Group and how is it created?

You can gather people you want to collaborate with in a Microsoft 365 group. Within the group  you can share different resources.

A Microsoft 365 group is always created “in the background” when you create any of these in Microsoft 365:

  • Shared library in your OneDrive
  • Sharepoint
  • Planner
  • Team

The people who have access to e.g. the planner also have access to the M365 group.

Groups you are a part of are visible in the menu on the left in Outlook, under “Groups”, with the exception of your Teams, which are hidden in Outlook.

What can we use the group for?

The members of the group can share different resources, for example a shared mailbox and a  shared calendar.

Shared mailbox

The group can use the shared mailbox to send emails within the group.

The email address will be groupname@o365.umu.se. Therefore, the group’s shared e-mail box should not be used to send external e-mails.

You can find the settings for the group’s mailbox in Outlook. Find and click the group under “Groups”, then click the “Group Settings” gear.

Shared calendar

The shared calendar can be used for joint planning within groups, as a digital notice board, joint meetings and more. Only the members of the group have access to it.

Roles in Microsoft 365 Groups

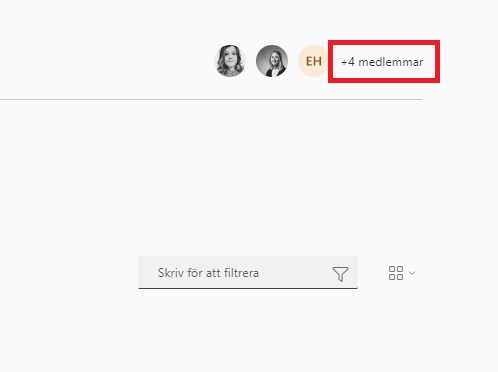
There are three different roles: owner, member and guest.

The owner administers who will be members, therefore it is good if there are at least two who are owners of a group.

Members and guests have largely the same permissions, which are to create, read and edit content.

Remove inactive groups

If you are a member of or own many groups, you may find it difficult to navigate among groups that are no longer in use. Groups can be hidden, which makes navigation easier, but these groups can also pose a threat to information security, especially if there is information that no one owns and takes responsibility for. If you have also invited external guests with accounts that UmU does not manage, these accounts may end up in the hands of people who are not intended to have access to the information.

Therefore, we recommend that you delete groups that are no longer in use. Keep in mind that if you delete a group, all content associated with the group will disappear.

Delete groups in Microsoft 365

https://manual.umu.se/wp-content/uploads/2018/02/manual-loggo.png 0 0 Elin Sköld https://manual.umu.se/wp-content/uploads/2018/02/manual-loggo.png Elin Sköld2024-08-06 11:05:092025-11-03 10:12:20About groups in Microsoft 365

Email notifications to group forms

2024-08-06/in Email, Employee, English, Forms, Microsoft 365, Okategoriserade, Student

When you create group forms in Forms, and want to receive email notifications when a response is submitted in the form, you need to make additional settings than just in the form. In this manual, we describe how you can receive notifications to a group email, when you create group forms in Forms.

  1. Go to Microsoft Forms
  2. Go to the bottom of the page and find the group/team form you want notifications from
  3. Click on the team you want to set up email notifications for
  4. Up in the right corner you see the members of the Team. Click on the button that says how many members the team has
  5. Bild som visar där man ser hur många medlemmar teamet har
  6. Now Outlook on the web opens. At the top left of the menu, click Edit
  7. In the box that now opens, check Allow people outside the organization to send email to the group (you may need to scroll down a bit in the box)
  8. Then click Save.
  9. Done! You have now set your group forms to be allowed to receive email notifications. Make sure you also set in the group form that you want to receive email notifications for each submitted answer.
https://manual.umu.se/wp-content/uploads/2018/02/manual-loggo.png 0 0 Elin Sköld https://manual.umu.se/wp-content/uploads/2018/02/manual-loggo.png Elin Sköld2024-08-06 10:10:132025-10-31 08:10:47Email notifications to group forms

Get started with your personal booking page with Bookings with me

2024-08-06/in Bookings, Employee, English, Microsoft 365, Okategoriserade, Student

Bookings with me is a digital personal booking tool that integrates with your free/busy time in your Outlook calendar. The service can be used, for example, when you need to schedule employee meetings or want to offer tutoring sessions or coaching to students and colleagues. This manual guides you on how to get started with your personal booking page. If you want to know how to create and get started with a shared booking page, I recommend you to look at this page: Create a booking site in Bookings

  1. Go to the portal at m365.umu.se
  2. Go to the menu in the top left corner and then click on Bookings.
  3. You are now on Booking’s home page.
    *  To create an appointment type in Bookings for me, click Create appointment type.
    * To create a new shared booking page, click Create booking page.
  4. Choose a title or a name for the meeting that can be booked and a short description if desired. Enter the location and how long the meeting should be
  5. Also choose whether the meeting should be of the type Public or private. You can read about the differences in Frequently Asked Questions about Bookings
    Please note that your personal booking page is automatically added to your email signature unless you click out of it (during the selection of public and private)

  6. Under “Schedule adaptation” you specify when you should be able to book
    1: Use my usual meeting times: Suggested times to the booker are displayed based on your availability in the calendar. If you have a gap between two bookings in your calendar, that gap will appear as an available option on your booking page.
    2: Use customized availability hours: Here you specify the date range during which it should go and book alternatively if there are any special time frames. Maybe it is only on Mondays that you want it to be possible to book?
  7. Under advanced settings, you can set lead and buffer time as well as reminders and whether automatic follow-up messages should go out after the meeting. Read more about what this means under FAQs
  8. Click save at the top right when you’re done.
  9. You can now share a link to your booking page or meeting type and receive bookings. Depending on whether your meeting is private or public, you share in different ways. If it’s a public meeting, you use the Share button at the top, while if it’s a private meeting, you click the share button directly on the meeting type. Good luck!
https://manual.umu.se/wp-content/uploads/2018/02/manual-loggo.png 0 0 Elin Sköld https://manual.umu.se/wp-content/uploads/2018/02/manual-loggo.png Elin Sköld2024-08-06 09:56:222026-05-05 16:15:19Get started with your personal booking page with Bookings with me

Scheduling Assistant in Outlook

2024-08-06/in Email, Employee, English, Microsoft 365, Okategoriserade

In this manual, we describe how to do a scheduling poll in Outlook. You can use scheduling poll to agree on a meeting time, where the meeting participants can vote on a time that suits them. This feature is available for Windows and on the web. The manual will be based on the web to also suit those who use, for example, Mac.

  1. Go to the portal (m365.umu.se) and open Outlook.
  2. Go to the calendar and click New Event, and select Event.
    Bild som visar hur du kommer till schemaläggningsomröstningen
  3. Now you get a box where you invite the meeting participants and set a title for the meeting.
  4. Then go to Scheduling Poll in the menu bar
  5. Bild som visar schemaläggningsomröstningen i menyraden
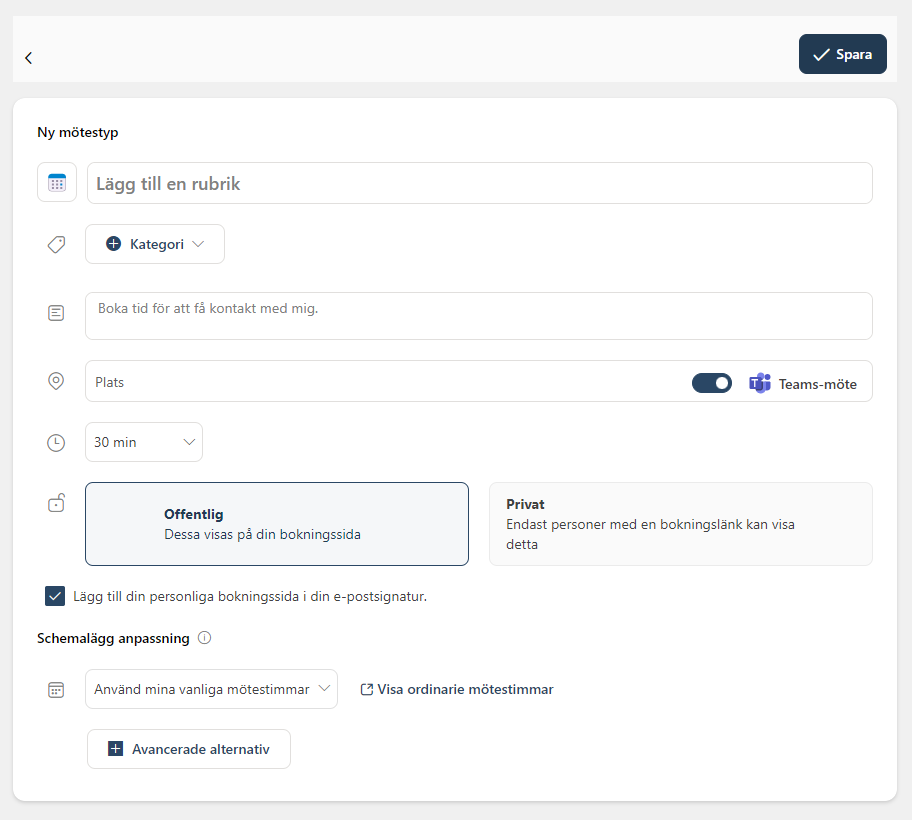
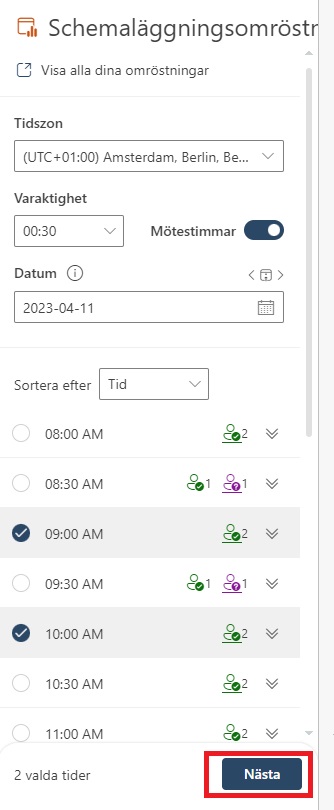
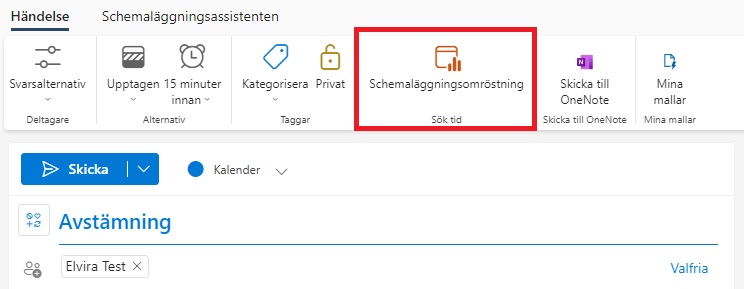
Now you get a box on the right. Here you can choose how long the meeting should be, and what date it is. Below you can see suggestions for times when it would suit all meeting participants, or one of the meeting participants. Once you have selected which proposals you want to send out, click Next.
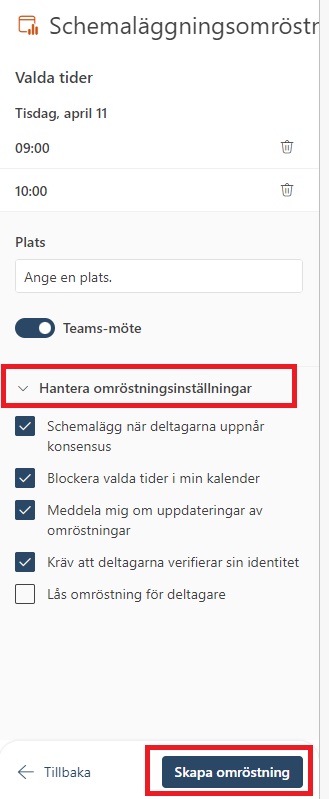
    Bild som visar antalet tillgängliga mötesdeltagare
  6. Now you see a box with an overview of the times you selected. Here you can also choose a place, or check in Teams meeting. Under “Manage voting settings” you get options you can choose to check or uncheck:

– Schedule when the participants reach consensus: Tick this if you want the meeting to be booked automatically in the Outlook calendar when you have agreed on a time.

– Block selected times in my calendar: Add placeholders to your calendar for all of the selected times.

– Notify me of poll updates: Receive an email when a meeting attendee casts a vote.

– Require participants to verify their identity: Participants who vote must be logged in, so it is possible to identify who voted.

– Lock poll for participants: Participants cannot propose new times. When you feel ready, click Create Poll.

Bild som visar inställningar i omröstningen

7. Now you see an overview of what you send in your poll, and can write a message in the email. When you’re ready, click Submit.

8. When you send the scheduling poll, placeholders will be created in your and the recipients’ calendars, for the selected times.

9. Done! When they vote, you get an email, and if everyone agrees on the same time, a booking is added to the calendar for that time, and the placeholders disappear.

https://manual.umu.se/wp-content/uploads/2018/02/manual-loggo.png 0 0 Elin Sköld https://manual.umu.se/wp-content/uploads/2018/02/manual-loggo.png Elin Sköld2024-08-06 09:40:492026-04-09 09:08:28Scheduling Assistant in Outlook

REDCap

2024-03-22/in Employee, English

REDCap is a web-based service for data collection in research studies.

Read more
https://manual.umu.se/wp-content/uploads/2018/02/manual-loggo.png 0 0 Erik Öhman https://manual.umu.se/wp-content/uploads/2018/02/manual-loggo.png Erik Öhman2024-03-22 15:55:372025-11-19 08:51:08REDCap

Open a shared mailbox in webmail

2024-03-13/in Email, Employee, Okategoriserade
Read more
https://manual.umu.se/wp-content/uploads/2018/02/manual-loggo.png 0 0 Erik Öhman https://manual.umu.se/wp-content/uploads/2018/02/manual-loggo.png Erik Öhman2024-03-13 15:36:442025-10-06 16:13:09Open a shared mailbox in webmail

Blocked account due to risk use in Microsoft 365

2024-03-12/in Employee, Microsoft 365

This manual describes how to handle if your account has been banned due to suspicious activity that indicates a high risk to your account, and you are considered a risky user. To restore your account, you’ll need to reset your password.

If your account is blocked due to risky usage, you will receive a block and will not be able to use Microsoft 365 with your UMU account. Then you’ll see this window below:
Image showing what it looks like when a your account is blocked

To restore your account and recieve access to it you need to reset your password:

  1. Go to administrationsverktyg.umu.se/Settings. Click on “I have forgotten my Umu-ID and/or password”.
    Image showing your settings in the administrator tool
  2. Under Reset password, select the option that’s right for you.
    Image showing where to reset your password
  3. Now, type in your new password, and then click Save.
    Image showing how to reset your password
  4. Done! Now you’ve reset your password and can log in to your UMU-account with your new password.
https://manual.umu.se/wp-content/uploads/2018/02/manual-loggo.png 0 0 Sanna Jacobsson https://manual.umu.se/wp-content/uploads/2018/02/manual-loggo.png Sanna Jacobsson2024-03-12 13:01:282025-12-04 14:58:08Blocked account due to risk use in Microsoft 365
Page 2 of 10‹1234›»

Contact ITS Service Desk

Create a support ticket at www.umu.se/servicedesk, call 090-786 63 00 or visit us next to Infocenter.

Kategorier

Scroll to top Scroll to top Scroll to top