Manual

Manual
  • Svenska
  • Menu Menu

Insert an image in the graphic design tool

2023-08-17/in Employee, Graphic design tool, Okategoriserade

Settings may differ slightly between the different templates in the tool.

The form for the document template looks like this:

Document template for images.

  1. Click the empty white box to select image and the following field will pop up:
    Image field
  2. Under “Search”, you can search and select an image from the University’s image database, Mediabanken. The easiest way to search among available images is to go to Mediabanken, find the ID number and paste it in the graphic design tool search field.  Always check that you have the right to use the image. You can also choose to upload your own image.
  3. After selecting an image, there are some settings you can make.
    Image settings

    • “Position” determines what part of the image is shown. Try your way forward.
    • “Zoom” allows you to zoom in and out of the image within the available area.
    • “Height” is available in some templates and allows you to alter the height of the image.
    • In the field labelled “Author”, you must specify the photographer or illustrator of the photo or illustration.
https://manual.umu.se/wp-content/uploads/2018/02/manual-loggo.png 0 0 Ida Åberg https://manual.umu.se/wp-content/uploads/2018/02/manual-loggo.png Ida Åberg2023-08-17 13:08:052025-08-13 14:51:46Insert an image in the graphic design tool

Activate Microsoft MFA

2023-08-07/in Employee, English, Multi-factor authentication, Student, Umu-id

In this guide, we describe how to activate MFA for your Umu ID using your computer and mobile.

Read more
https://manual.umu.se/wp-content/uploads/2018/02/manual-loggo.png 0 0 Erik Öhman https://manual.umu.se/wp-content/uploads/2018/02/manual-loggo.png Erik Öhman2023-08-07 14:33:152026-06-01 11:33:47Activate Microsoft MFA

Record meetings in Teams

2023-03-15/in Employee, Microsoft 365, Student, Teams

In this manual, we describe how to record digital meetings in Teams, and where to find the recording when the meeting is over. Please note that it is important that you notify the participants in the meeting beforehand so they can decide whether it is okay to be recorded.  

Think before you record a meeting 

Ideally, avoid recording meetings unless you absolutely have to. Rather, write memos to document the meeting. If you still want to record a meeting, you should: 

  • Inform the participants in the meeting before so they can decide whether it is okay to be recorded. 
  • Ensure that the information recorded does not contain sensitive data. 

Join a Teams meeting

  1. After you start or join a teams meeting, click More, and then  click Record and Transcribe.
    Image showing how to record you meeting
  2. Now you will bring up another box, click Start recording when you are ready. Here you can also choose to Start transcription, if you want to transcribe the meeting.
    Image showing how to start recording your meeting
  3. When you want to end the recording, do the same as when you started recording. You go to More and then Record and Transcribe, then click Stop recording.  Recording also stops automatically when the meeting ends.
    Image showing how to stop recording your meeting
  4. Now you have made a recording of your Teams meeting. It may take a few minutes for the recording to be saved. The recording will be automatically saved in the meeting chat after the meeting is finished. Depending on the type of Teams meeting you recorded, the recording will be saved in different places 
    – Channel meeting: The recording is saved in a folder under “Files” in the channel’s SharePoint, where all members of the team have access to it.  
    – Regular meeting: The recording is saved in the “Recordings” folder on OneDrive for the one who started the recording. 

Automatic recording 

Before the meeting begins, you can choose to have it recorded automatically. Go to Meeting Options, and then check Record automatically. If you choose to do this, it is important that the participants in the meeting agree before the meeting starts that it is okay to be recorded.
Image showing meeting options in Teams

https://manual.umu.se/wp-content/uploads/2018/02/manual-loggo.png 0 0 Sanna Jacobsson https://manual.umu.se/wp-content/uploads/2018/02/manual-loggo.png Sanna Jacobsson2023-03-15 11:58:462026-03-10 11:23:59Record meetings in Teams

Transfer a call

2023-03-08/in Employee, Microsoft 365, Teams

1. When you’re in a call, select More actions > Transfer in your call controls.

2. Start typing the name of the person or phone number you want to transfer the call to and select them when they appear.

3. If you are transferring to another Teams user, turn on Ring back if there’s no answer to send the call back to you if the recipient doesn’t answer. If this setting is not turned on the call will be transferred to the recipient voicemail if there is no answer. If you get the call back the popup toast will show that the recipient was not reached.

4. Select Transfer to complete the transfer.

Consult then transfer

You may want to check in with someone before you transfer a call.

Note: Consult then transfer is not available in Teams for the web.

1. When you’re in a call, select More actions   > Consult then transfer.

2. Under Choose a person to consult, start typing the name of the person you want to reach or a phone number and select them when they appear.

3. Consult with them by calling or using chat. Click on the chat button to start a chat, or select Teams audio call from the drop down options.

4. When you’re ready, hit Transfer to complete the transfer.

https://manual.umu.se/wp-content/uploads/2018/02/manual-loggo.png 0 0 Elin Sköld https://manual.umu.se/wp-content/uploads/2018/02/manual-loggo.png Elin Sköld2023-03-08 12:42:322025-11-14 08:35:45Transfer a call

Log-in/log-out from Call Queues in Teams

2023-03-08/in Employee, Microsoft 365, Teams

When you are assigned as an agent in a Teams Call Queue, it is possible to opt-in (sign in) and opt-out (sign out). It is only when you are in opt-in status that you will get calls from the Call Queue routed to your Teams client.

Call Queues can be configured so you only get calls when you are in the status “Available” (Green).

The option to sign out and in can be disabled for some Call Queues, talk to the owner of the Call Queue if you are not able to use this function.

1. Open Settings in Teams by clicking on the three dots next to your profile image and select Settings.

Settings in Teams

2. Open Calls in the left hand menu in settings and scroll down and you will see all Call Queues that you are assigned to. Click on the toggle switch to opt-in or opt-out.

Calls settings in Teams

Opt-in status  

Opt-out status

If the Call Queue you are using is attached to a Teams channel you can opt-in / opt-out directly from that channel in Teams.

1. Open the channel your Call Queue is connected to and select the Calls tab.

2. Next to your name click on the toggle switch to opt-in / opt-out.

Switch next to your name

3. You can also see other users assigned to the same Call Queue and if they have opted-in or opted-out.

Agents in call queue

https://manual.umu.se/wp-content/uploads/2018/02/manual-loggo.png 0 0 Elin Sköld https://manual.umu.se/wp-content/uploads/2018/02/manual-loggo.png Elin Sköld2023-03-08 10:07:022025-08-15 13:08:45Log-in/log-out from Call Queues in Teams

Create a booking site in Bookings

2023-02-20/in Bookings, Employee, English, Microsoft 365

Bookings is a digital booking tool where you can both book other people’s services and create your own pages where people can book your services. For example, it can be tutoring times, counseling, meetings, or other services of your choice. Below you can see a description of how to create your own booking page. 

Go to the portal at o365.umu.se

  1. Go to “the waffle” in the top left corner, and then click on Bookings.
    Image showing how to navigate to to Bookings
  2. Now, you are on the Bookings start page. To create a new booking site, click on Create.
    Image showing how where to create your booking site
  3. Now you can choose if you want to create a new booking site, or if you want to clone an existing calendar (booking site). To create a new, you click on Create from scratch.
    Image showing how to create a new booking site
  4. Now you choose a name for your booking site, the display name can be changed afterwards, however, the address name cannot be changed, so remember that if you change the name on your booking site, only the display name changes. You can also add a logo that will be shown on the start page of your booking site. On “Business type” you choose whatever fits your service the most.
    Image showing how you enter the namne for the site
  5. Here you can choose if you want to invite another person to manage your booking site. In the search bar you can search for people in the organization. Afterwards, you can add more people that get access to the booking site. The one that creates the booking page, get the title: “Administrator”, and can manage and edit the site. The people you invite, is “guests”, and do not have the permissions. This can be changed when the site is created. You can also set up room and resources as staff if you want a booking calendar for them.
    Image showing how you can invite staff to your booking site
  6. Here you can adjust your times for your service. Click on Change if you want to change the pre set times. This can also be changed once you have created your booking site. Click on Next to continue creating the site.
    Image showing how you set up your times
  7. Now you can choose who are going to be able to book your services. When you have chosen, click on Create.
    – No self-service: This means that only staff can book appointments.
    – People in my organization: This means that a Umu-id is required to be able to book.
    – Anyone: This means that anyone can book your services both inside Umea University and externals.
    Image showing the alternatives for who can book
  8. Done! Now your booking site is created.
https://manual.umu.se/wp-content/uploads/2018/02/manual-loggo.png 0 0 Sanna Jacobsson https://manual.umu.se/wp-content/uploads/2018/02/manual-loggo.png Sanna Jacobsson2023-02-20 12:33:442026-01-09 15:28:04Create a booking site in Bookings

Install VPN client

2023-02-17/in Employee, Student, VPN

Manuals that describe how to install the VPN client on different systems/devices.

Read more
https://manual.umu.se/wp-content/uploads/2018/02/manual-loggo.png 0 0 Erik Öhman https://manual.umu.se/wp-content/uploads/2018/02/manual-loggo.png Erik Öhman2023-02-17 15:08:442026-05-05 14:15:15Install VPN client

FAQ Bookings

2023-02-10/in Bookings, Employee, English, Microsoft 365
Read more
https://manual.umu.se/wp-content/uploads/2018/02/manual-loggo.png 0 0 Sanna Jacobsson https://manual.umu.se/wp-content/uploads/2018/02/manual-loggo.png Sanna Jacobsson2023-02-10 08:53:502026-03-06 12:55:51FAQ Bookings

Create and edit authority records in DiVA

2023-01-24/in DiVA, Employee, English

When registering a publication in DiVA, you can easily retrieve information about an author at Umeå University by searching for the author’s authority record and linking it to the publication. Since the authority record contains information such as name, UMU ID, ORCID and organisation, you don’t need to enter this information manually each time.

Edit your authority record

Log in to DiVA with your UMU ID. You can edit your authority record via the “My authority record” entry on the first page of the DiVA administration interface.

In your own authority record, you can add or change

  • year of birth
  • e-mail address
  • academic title
  • biography
  • links (e.g. to your website or blog).

You can also set whether you want your authority record to be hidden from public view. By default, the authority record is active and public. If you don’t want your record to be public, click on the small box next to “This record is searchable in the public search interface” at the top of the page under “Public authority record”.

You cannot change names or add names/alternative names. Contact the library if you, for example, change your surname.

Update the authority record from the registration form

When you register a new publication or modify an existing record, you can update your personal record directly in the edit form.

  1. Go to “Add new publication / Upload files” or find an existing record to edit.
  2. Enter your name or UMU ID under author.
  3. Link your authority record to the publication by clicking on “Connect authority record”.
  4. Fill in the information you want to change. The following are possible:
    • add alternative name forms
    • change year of birth
    • add an organisation (by clicking on “Select organisation” and searching or scrolling to the right department or unit)
    • change e-mail address.
  5. Click on “Update authority record”.

Create an authority record

If you don’t have an authority record in DiVA, you can create one when registering a publication. To create an authority record, you need to have either an UMU ID or an ORCID. You create the authority record when you register a new publication and enter your author details.

First, check if you have an authority record by entering your name or UMU ID and then click on “Connect authority record”. If you cannot find an authority record, click on cancel. Remember to fill in all author details before creating the authority record itself.

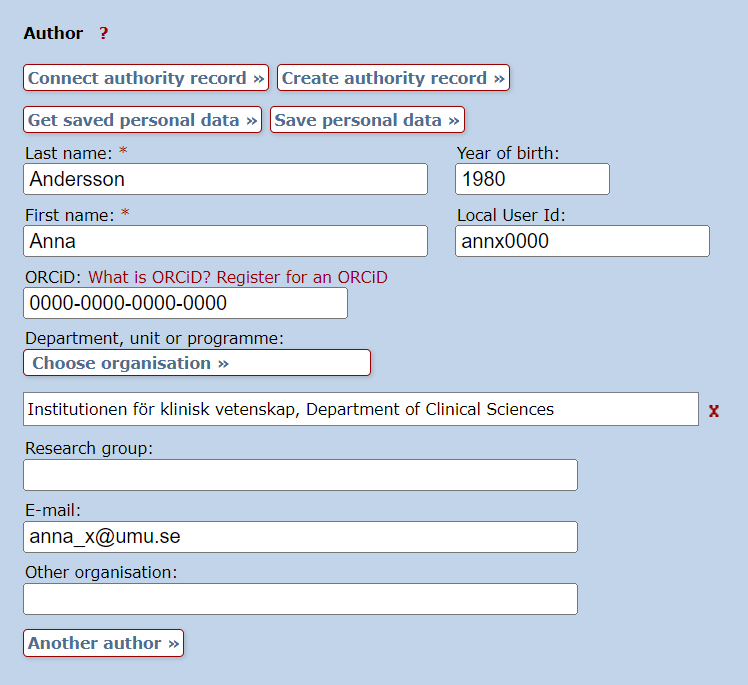
  1. Fill in the following information under author:
    • first name and last name
    • UMU ID
    • ORCID
    • e-mail address
    • organisation (choose from the list of organisations).
  2. Click on “Create authority record”.

Pre-filled information about an author in DiVA. The button Create authority record is above the fields.

You can edit your authority record according to the instructions above if you want to add information afterwards. Please note that you will need to log out and then log back in to edit your authority record via the “My authority record” entry on the home page.

ORCID

An ORCID is a persistent identifier (PID) linked to your person and distinguishes you from other researchers. Read more about ORCID and other identifiers for researchers:

Use an author ID

Contact the library

Contact the library if you need help making changes to your authority record and cannot edit it yourself. Select Publishing, theses and research data as the subject area.

Contact the library

https://manual.umu.se/wp-content/uploads/2018/02/manual-loggo.png 0 0 Marika Lundqvist https://manual.umu.se/wp-content/uploads/2018/02/manual-loggo.png Marika Lundqvist2023-01-24 13:50:462025-08-26 14:58:56Create and edit authority records in DiVA

Register compilation thesis in DiVA

2023-01-20/in DiVA, Employee, English
Read more
https://manual.umu.se/wp-content/uploads/2018/02/manual-loggo.png 0 0 Marika Lundqvist https://manual.umu.se/wp-content/uploads/2018/02/manual-loggo.png Marika Lundqvist2023-01-20 11:55:242026-05-06 13:26:42Register compilation thesis in DiVA
Page 4 of 10«‹23456›»

Contact ITS Service Desk

Create a support ticket at www.umu.se/servicedesk, call 090-786 63 00 or visit us next to Infocenter.

Kategorier

  • Contact the Library

Scroll to top Scroll to top Scroll to top